SHIELD® Rubber Belt Installation

|
Remove
the used Rubber Belt (RB) from the machine. |
|
|
Remove
and Inspect all Cylinders and Bearings, except for the Steam Cylinder.
Inspect the face of the Cylinders, including the Stop Rolls, for
any burrs, nicks, rough and/or rust spots, etc. Any suspect area
should be repaired or replaced to prevent premature damage to the
new RB. |
|
|
If
a Clip Expander is used, move it as far back from the RB machine
as possible. |
|
|
Be
sure the floor at the entrance and exit end, as well as, under the
RB machine is clean. Place cardboard, or some other suitable material
to protect the RB, in front, under and behind the machine. NOTE:
If a Clip Expander is used, it is a good idea to also cover the
tracks. |
|
|
Move
the new RB, while still in the container, as close as possible to
the RB machine. |
|
|
Carefully
remove the containers Top and Inspection Panel by removing the ten
top bolts and two inspection panel bolts (BELTAINER 2000® only.
See diagram included with belt kit.) The RB is now accessible and
can be lifted from the container by forklift or hoist. |
|
|
Carefully
place the RB on the floor directly in front of the RB machine. |
NOTE:
Generally the Entrance end of the machine provides more free space
than the exit end. If, however, this is not the case in your plant,
you may elect to place the RB at the exit end instead.
|
|
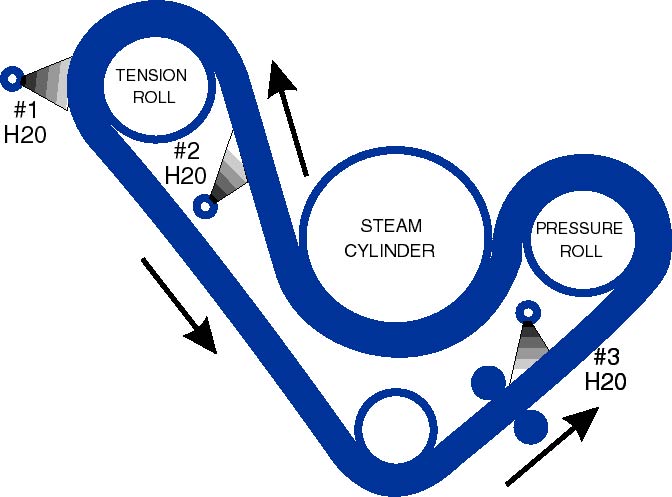
Assuming
the RB has been positioned at the entrance end, go to the back of
the RB machine and, by means of a hoist and/or slings, pull the
RB under the Steam Cylinder. The goal is to center the RB with the
Steam Cylinder, side to side, as well as, front to back. |
|
|
Wrap
all cylinder journals with fabric to prevent damage to the RB. Apply
Talcum powder (Talc) to the inside of the RB. NOTE: Both
of these steps help prevent damage during the placement of the cylinders
through the RB. |
|
|
Place
the Idler Roll (bottom cylinder) through the RB and fasten.
|
|
|
Place
the Tension Roll through the RB, but do not lift into
position at this point. |
|
|
Place
the Compression Roll through the RB and lift (usually by hoist)
into position and fasten. |
|
|
Return
to the exit end of the RB machine. Attach slings to the Tension
Roll journals and lift into position and fasten. NOTE:
Be sure to fasten this cylinder in the bottom position. This will
make the installation easier and insure minimum tension on the RB.
|
|
|
Place
the Idler Roll (bottom cylinder) through the RB and fasten.
|
|
|
Place
the Tension Roll through the RB, but do not lift into
position at this point. |
|
|
Move
the RB towards the front of the machine. Go to the front of the
machine and place the inside Water Removal Roll into position
and fasten. |
|
|
Place
the Compression Roll through the RB and lift (usually by hoist)
into position and fasten. |
|
|
Return
to the exit end of the RB machine. Attach slings to the Tension
Roll journals and lift into position and fasten. NOTE:
Be sure to fasten this cylinder in the bottom position. This will
make the installation easier and insure minimum tension on the RB.
|
|
|
Place
the outside Water Removal Roll into position and fasten.
|
|
|
Install
all Water lines. Make absolutely sure they are spraying water in
the correct direction and that the spray extends across the entire
width of the RB. |
NOTE: The Felt
Dr. Blade, located near the Tension Roll, should be positioned so
that a pool of water forms across the entire belt width. If needed,
replace with a new Felt Blade. (Available for free plus shipping charges
through U.S. Supply Co.)
|
|
Install
the two Stop Rolls on either side of the RB. These rolls should
be set perpendicular to the belt’s edge. They should also have
a clearance of 25 mm from the belt’s edge on both sides of
the machine and must be free turning at all times. Again, please
check to insure that no burrs or nicks are present, as they will
cut the belt’s edge. NOTE: The stop Rolls should not
extend beyond the width of the Steam Cylinder. If this happens,
the edge of the Steam Cylinder could damage the RB. |
|
|
If
used, reinstall the Nip Guard. NOTE: This is a safety feature
to help prevent a person’s hand from being caught in the nip
area where the Compression Roll meets the Steam Cylinder. |
|
|
Check
the entire machine and the surrounding area to confirm there is
nothing inside the RB or on its surface that could cause
damage during start up. |
|
|
Set
RB Tension. (Please see enclosed Procedure for Tensioning.) |
|
|
Once
clean up is complete, you are now ready to process fabric. |
NOTE: Throughout
the installation process, it is advisable to remove any grease or oil
that gets on the belt’s surface.
|
|
IMPORTANT
NOTE:
SHIELD® Rubber Belts are ground before leaving the plant
with a sophisticated grinder that uses the equivalent of 80x grinding
cloth (U.S.A. standards). The result is typically a surface that
does not require further buffing before use. The exception,
however, may be very lightweight or delicate fabric styles. In this
case, it may be beneficial to grind with 100x or 120x, use plenty
of Talcum powder, and minimal pressure of the grinding roll against
the RB. |
Should
you have any questions concerning these instructions or have difficulty
installing the rubber belt, please contact us via support@ussupplyinc.com
or Fax 704-393-5628 or Tel 704-399-4276.
Copyright © 1997 - 2001 United States Supply Co., Inc.
All Rights Reserved
|
Related
Information:

Printer Friendly Version
|
